Application mobile native (téléchargeable sur l'App Store et le Play Store) qui utilise le micro, React Native eShop
Version Apps
our une application mobile native (téléchargeable sur l'App Store et le Play Store) qui utilise le micro, React Native est la solution standard de l'industrie.
Voici le code complet adapté pour React Native (via Expo).
PPré-requis et Dépendances
Contrairement au Web, nous ne pouvons pas utiliser navigator.mediaDevices. Nous allons utiliser Expo AV qui est la librairie standard pour gérer l'audio sur iOS et Android.
Vous devrez installer ces paquets dans votre projet :
Bash
npx expo install expo-av expo-file-system lucide-react-native
Le Code Complet (App.js)
Ce code gère l'interface native (View, Text, TouchableOpacity), les permissions micro iOS/Android, l'enregistrement du fichier audio et son envoi (multipart/form-data) vers n8n.
JavaScript
import React, { useState, useEffect } from 'react';
import {
  StyleSheet,
  Text,
  View,
  SafeAreaView,
  TextInput,
  TouchableOpacity,
  Image,
  FlatList,
  Alert,
  ActivityIndicator,
  Platform,
  StatusBar
} from 'react-native';
import { Audio } from 'expo-av';
import { Mic, Search, User, MapPin, Plus, ShoppingCart } from 'lucide-react-native';

// --- DONNÉES SIMULÉES (Mêmes que version Web) ---
const INITIAL_PRODUCTS = [
  { id: 101, name: "Pansements non-tissés", price: 4.99, unit: "Boîte de 50", img: "https://placehold.co/150x150/png?text=Pansements", qty: 1 },
  { id: 102, name: "Bréfes pour adulte", price: 16.99, unit: "Paquet de 20", img: "https://placehold.co/150x150/png?text=Couches", qty: 1 },
  { id: 103, name: "Crème hydratante", price: 7.50, unit: "Flacon de 250 ml", img: "https://placehold.co/150x150/png?text=Crème", qty: 1 },
  { id: 104, name: "Gants en nitrile", price: 9.49, unit: "Boîte de 100", img: "https://placehold.co/150x150/png?text=Gants", qty: 1 },
  { id: 105, name: "Compresses stériles", price: 5.99, unit: "Paquet de 25", img: "https://placehold.co/150x150/png?text=Compresses", qty: 5 },
  { id: 106, name: "Alèses jetables", price: 11.99, unit: "Paquet de 30", img: "https://placehold.co/150x150/png?text=Alèses", qty: 1 },
];

const PATIENT_INFO = {
  id: 12345,
  name: "Mme Ursula LAURET",
  address: "137 rue d'Alésia, 75014 Paris"
};

export default function App() {
  const [products, setProducts] = useState(INITIAL_PRODUCTS);
  const [recording, setRecording] = useState(null);
  const [isRecording, setIsRecording] = useState(false);
  const [isProcessing, setIsProcessing] = useState(false);

  // Demande de permission au démarrage
  useEffect(() => {
    (async () => {
      const { status } = await Audio.requestPermissionsAsync();
      if (status !== 'granted') {
        Alert.alert('Permission refusée', 'L\'accès au micro est nécessaire pour commander vocalement.');
      }
    })();
  }, []);

  // --- LOGIQUE AUDIO NATIVE ---
  async function startRecording() {
    try {
      await Audio.setAudioModeAsync({
        allowsRecordingIOS: true,
        playsInSilentModeIOS: true,
      });

      const { recording } = await Audio.Recording.createAsync(
        Audio.RecordingOptionsPresets.HIGH_QUALITY
      );

      setRecording(recording);
      setIsRecording(true);
      console.log('Enregistrement démarré');
    } catch (err) {
      console.error('Erreur lancement enregistrement', err);
    }
  }

  async function stopRecording() {
    console.log('Arrêt enregistrement...');
    setRecording(undefined);
    setIsRecording(false);

    await recording.stopAndUnloadAsync();
    const uri = recording.getURI();
    console.log('Fichier sauvegardé à :', uri);

    uploadAudio(uri);
  }

  // --- ENVOI VERS N8N ---
  async function uploadAudio(uri) {
    setIsProcessing(true);

    // En React Native, FormData fonctionne un peu différemment du Web
    const formData = new FormData();

    // On doit définir le type MIME et le nom manuellement pour Android/iOS
    const fileType = Platform.OS === 'ios' ? 'audio/m4a' : 'audio/mp4';
    const fileName = `commande_${Date.now()}.${Platform.OS === 'ios' ? 'm4a' : 'mp4'}`;

    formData.append('audio_file', {
      uri: uri,
      name: fileName,
      type: fileType,
    });

    formData.append('patient_id', String(PATIENT_INFO.id));

    try {
      // Remplacez par votre URL n8n
      const response = await fetch('https://votre-n8n.com/webhook/audio-order', {
        method: 'POST',
        body: formData,
        headers: {
          'Content-Type': 'multipart/form-data',
        },
      });

      if (response.ok) {
        Alert.alert("Succès", "Commande vocale envoyée !");
        // Logique de mise à jour du panier ici...
      } else {
        Alert.alert("Erreur", "Le serveur n'a pas répondu correctement.");
      }
    } catch (error) {
      console.error(error);
      Alert.alert("Erreur réseau", "Impossible de joindre n8n.");
    } finally {
      setIsProcessing(false);
    }
  }

  // --- UI LOGIQUE ---
  const updateQty = (id, delta) => {
    setProducts(products.map(p =>
      p.id === id ? { ...p, qty: Math.max(0, p.qty + delta) } : p
    ));
  };

  const totalItems = products.reduce((acc, curr) => acc + curr.qty, 0);

  // --- RENDER CARD PRODUIT ---
  const renderItem = ({ item }) => (
    <View style={styles.card}>
      <View style={styles.imageContainer}>
        <Image source={{ uri: item.img }} style={styles.productImage} resizeMode="contain" />
      </View>
      <View style={styles.cardContent}>
        <Text numberOfLines={2} style={styles.productName}>{item.name}</Text>
        <Text style={styles.productPrice}>€{item.price.toFixed(2)}</Text>
        <Text style={styles.productUnit}>{item.unit}</Text>

        <View style={styles.actionsRow}>
          <View style={styles.stepper}>
            <TouchableOpacity onPress={() => updateQty(item.id, -1)} style={styles.stepperBtn}>
              <Text style={styles.stepperText}>-</Text>
            </TouchableOpacity>
            <Text style={styles.stepperValue}>{item.qty}</Text>
            <TouchableOpacity onPress={() => updateQty(item.id, 1)} style={styles.stepperBtn}>
              <Text style={styles.stepperText}>+</Text>
            </TouchableOpacity>
          </View>
          <TouchableOpacity style={styles.addBtn}>
            <Plus color="white" size={20} />
          </TouchableOpacity>
        </View>
      </View>
    </View>
  );

  return (
    <SafeAreaView style={styles.container}>
      <StatusBar barStyle="dark-content" />

      {/* HEADER */}
      <View style={styles.header}>
        <Text style={styles.title}>Commandes</Text>
        <View style={styles.searchBar}>
          <Search color="#9CA3AF" size={20} style={{ marginRight: 10 }} />
          <TextInput placeholder="Rechercher des produits" style={styles.searchInput} placeholderTextColor="#9CA3AF" />
        </View>
      </View>

      {/* PATIENT INFO */}
      <View style={styles.patientBanner}>
        <View style={styles.avatar}>
          <User color="#2563EB" size={18} />
        </View>
        <View>
          <Text style={styles.patientName}>{PATIENT_INFO.name}</Text>
          <View style={styles.addressRow}>
            <MapPin color="#6B7280" size={12} style={{ marginRight: 4 }} />
            <Text style={styles.patientAddress}>{PATIENT_INFO.address}</Text>
          </View>
        </View>
      </View>

      {/* GRID */}
      <FlatList
        data={products}
        renderItem={renderItem}
        keyExtractor={item => item.id.toString()}
        numColumns={2}
        contentContainerStyle={styles.gridContent}
        columnWrapperStyle={styles.gridRow}
      />

      {/* BOTTOM BAR FLOTTANTE */}
      <View style={styles.bottomBar}>
        <TouchableOpacity
          onPress={recording ? stopRecording : startRecording}
          style={[
            styles.micButton,
            isRecording && styles.micActive,
            isProcessing && styles.micProcessing
          ]}
        >
          {isProcessing ? (
            <ActivityIndicator color="white" />
          ) : (
            <Mic color="white" size={28} />
          )}
        </TouchableOpacity>

        <TouchableOpacity style={styles.cartButton}>
          <Text style={styles.cartBtnText}>Voir panier</Text>
          {totalItems > 0 && (
            <View style={styles.badge}>
               <Text style={styles.badgeText}>{totalItems}</Text>
            </View>
          )}
        </TouchableOpacity>
      </View>

    </SafeAreaView>
  );
}

// --- STYLES (Tailwind-like) ---
const styles = StyleSheet.create({
  container: { flex: 1, backgroundColor: '#F9FAFB' },
  header: { padding: 16, backgroundColor: 'white' },
  title: { fontSize: 28, fontWeight: '800', marginBottom: 12, color: '#111827' },
  searchBar: { flexDirection: 'row', alignItems: 'center', backgroundColor: '#F3F4F6', borderRadius: 12, paddingHorizontal: 12, height: 48 },
  searchInput: { flex: 1, fontSize: 16, color: '#374151' },

  patientBanner: { flexDirection: 'row', padding: 12, backgroundColor: '#EFF6FF', borderBottomWidth: 1, borderBottomColor: '#E5E7EB', alignItems: 'center' },
  avatar: { backgroundColor: '#DBEAFE', padding: 8, borderRadius: 20, marginRight: 12 },
  patientName: { fontSize: 16, fontWeight: 'bold', color: '#1F2937' },
  addressRow: { flexDirection: 'row', alignItems: 'center', marginTop: 2 },
  patientAddress: { fontSize: 13, color: '#6B7280' },

  gridContent: { padding: 16, paddingBottom: 100 },
  gridRow: { justifyContent: 'space-between', marginBottom: 16 },

  card: { backgroundColor: 'white', borderRadius: 16, padding: 12, width: '48%', shadowColor: '#000', shadowOffset: { width: 0, height: 1 }, shadowOpacity: 0.05, shadowRadius: 2, elevation: 2 },
  imageContainer: { alignItems: 'center', marginBottom: 8, height: 100, justifyContent: 'center' },
  productImage: { width: 80, height: 80 },
  cardContent: { flex: 1, justifyContent: 'flex-end' },
  productName: { fontSize: 14, fontWeight: '600', color: '#1F2937', marginBottom: 4, height: 40 },
  productPrice: { fontSize: 16, fontWeight: 'bold', color: '#111827' },
  productUnit: { fontSize: 12, color: '#9CA3AF', marginBottom: 12 },

  actionsRow: { flexDirection: 'row', alignItems: 'center', justifyContent: 'space-between' },
  stepper: { flexDirection: 'row', alignItems: 'center', borderWidth: 1, borderColor: '#E5E7EB', borderRadius: 8, height: 36, flex: 1, marginRight: 8, justifyContent: 'space-between' },
  stepperBtn: { paddingHorizontal: 8, height: '100%', justifyContent: 'center' },
  stepperText: { color: '#6B7280', fontSize: 18 },
  stepperValue: { fontWeight: '600', fontSize: 14 },
  addBtn: { backgroundColor: '#2563EB', borderRadius: 8, width: 36, height: 36, alignItems: 'center', justifyContent: 'center' },

  bottomBar: { position: 'absolute', bottom: 0, left: 0, right: 0, backgroundColor: 'rgba(255,255,255,0.95)', padding: 16, borderTopWidth: 1, borderTopColor: '#E5E7EB', flexDirection: 'row', alignItems: 'center', gap: 12, paddingBottom: 30 },
  micButton: { width: 56, height: 56, borderRadius: 28, backgroundColor: '#EF4444', alignItems: 'center', justifyContent: 'center', shadowColor: '#EF4444', shadowOffset: { width: 0, height: 4 }, shadowOpacity: 0.3, shadowRadius: 8, elevation: 4 },
  micActive: { backgroundColor: '#DC2626', transform: [{ scale: 1.1 }] },
  micProcessing: { backgroundColor: '#EAB308' },

  cartButton: { flex: 1, backgroundColor: '#2563EB', height: 56, borderRadius: 16, flexDirection: 'row', alignItems: 'center', justifyContent: 'center', shadowColor: '#2563EB', shadowOffset: { width: 0, height: 4 }, shadowOpacity: 0.3, shadowRadius: 8, elevation: 4 },
  cartBtnText: { color: 'white', fontWeight: 'bold', fontSize: 18, marginRight: 8 },
  badge: { backgroundColor: '#3B82F6', paddingHorizontal: 6, paddingVertical: 2, borderRadius: 4 },
  badgeText: { color: 'white', fontSize: 12, fontWeight: 'bold' }
});
Points Clés Techniques pour React Native :
- Structure du fichier audio (FormData) :
- Sur le Web, on passe un Blob direct.
- Sur React Native, on passe un objet JSON spécifique : { uri: 'file://...', name: 'audio.m4a', type: 'audio/m4a' }. Sans cela, votre serveur n8n/Odoo rejettera le fichier.
- FlatList vs map :
- J'ai utilisé FlatList avec numColumns={2}. C'est beaucoup plus performant que la boucle .map() utilisée en React Web, surtout si la liste de produits grandit (scroll infini, etc.).
- Permissions :
- Le code inclut Audio.requestPermissionsAsync(). Sur iOS, cela ajoutera automatiquement la clé nécessaire dans Info.plist lors de la compilation Expo.
- Style :
- J'ai recréé le look "Tailwind" (arrondis, ombres douces, typographie) en utilisant StyleSheet natif. Cela garantit que l'app ressemble exactement aux images que j'ai générées, mais avec des composants natifs fluides.
Recommandations pour cette application
C'est indispensable. Non seulement pour la sécurité (RGPD/HDS car on manipule des données de santé et d'adresses), mais surtout pour l'efficacité opérationnelle.
Une infirmière en tournée n'a pas le temps de chercher "Ursula Lauret" parmi 500 clients. Elle doit voir sa "Tournée du jour".
Voici l'architecture et le flux que je vous recommande pour implémenter cela proprement avec Odoo.
1. L'Architecture Recommandée (App Native + Odoo)
L'idée est d'utiliser Odoo comme serveur d'authentification et de gestion des droits.
Le Flux Utilisateur (User Flow) :
- Écran de Login : L'infirmière entre son email/mot de passe (compte utilisateur Odoo).
- Récupération de Session : L'App reçoit un session_id et un uid (User ID) de la part d'Odoo.
- Écran "Ma Tournée" (Dashboard) : L'App fait un GET sur les contacts (res.partner) filtrés pour cette infirmière.
- Sélection Patient : Elle clique sur "Ursula Lauret".
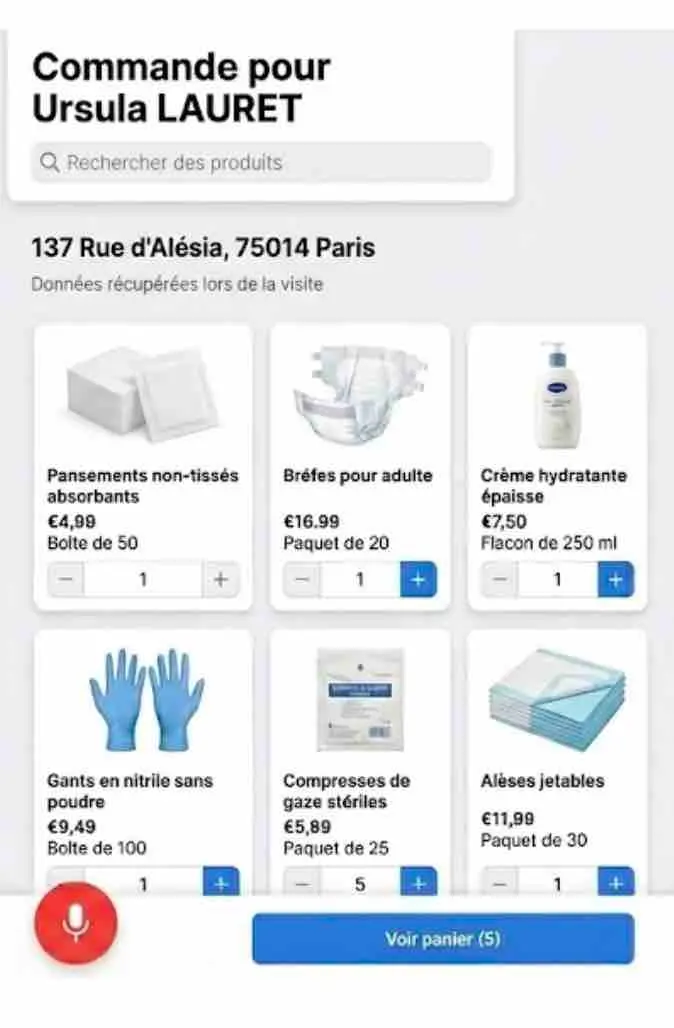
- Écran de Commande : C'est l'écran que nous avons conçu précédemment, mais peuplé dynamiquement.
2. Modification du Modèle de Données Odoo
Côté Odoo, il faut lier les patients à l'infirmière. Vous avez deux options simples :
- Option A (Standard "Vendeur") : Utiliser le champ natif user_id (Vendeur/Commercial) sur la fiche contact et le renommer "Infirmière référente". C'est le plus simple : Odoo filtre déjà nativement "Mes contacts".
- Option B (Champ Custom) : Créer un champ x_nurse_id (Many2one vers res.users) si vous voulez garder le champ vendeur pour un commercial médical.
3. Implémentation Technique (React Native)
Il nous faut un Navigator (gestion des pages). Voici à quoi ressemblerait la structure du code avec un écran de Login qui mène à la liste.
A. Service d'Authentification (auth.js)
Ce fichier gère la connexion JSON-RPC pure.
JavaScript
// services/odooAuth.js
const ODOO_URL = 'https://votre-instance.odoo.com';
const DB_NAME = 'votre_db';

export const loginOdoo = async (login, password) => {
  const url = `${ODOO_URL}/web/session/authenticate`;

  try {
    const response = await fetch(url, {
      method: 'POST',
      headers: { 'Content-Type': 'application/json' },
      body: JSON.stringify({
        jsonrpc: "2.0",
        method: "call",
        params: {
          db: DB_NAME,
          login: login,
          password: password
        }
      })
    });

    const result = await response.json();

    if (result.error) {
      throw new Error(result.error.data.message);
    }

    // Retourne le contexte utilisateur (uid, session_id, name...)
    return result.result;

  } catch (error) {
    console.error("Auth Error", error);
    return null;
  }
};
B. Écran de Login (LoginScreen.js)
Simple, propre et efficace.
JavaScript
import React, { useState } from 'react';
import { View, Text, TextInput, TouchableOpacity, Alert, StyleSheet, ActivityIndicator } from 'react-native';
import { loginOdoo } from '../services/odooAuth';

export default function LoginScreen({ navigation }) {
  const [email, setEmail] = useState('');
  const [password, setPassword] = useState('');
  const [loading, setLoading] = useState(false);

  const handleLogin = async () => {
    setLoading(true);
    const userSession = await loginOdoo(email, password);
    setLoading(false);

    if (userSession) {
      // On navigue vers la liste des patients en passant l'ID de l'infirmière
      navigation.replace('PatientList', { nurseId: userSession.uid, nurseName: userSession.name });
    } else {
      Alert.alert("Erreur", "Identifiants incorrects ou problème de connexion");
    }
  };

  return (
    <View style={styles.container}>
      <View style={styles.logoArea}>
        <Text style={styles.title}>Soins Connect</Text>
        <Text style={styles.subtitle}>Accès Personnel Soignant</Text>
      </View>

      <View style={styles.form}>
        <TextInput
          placeholder="Email Odoo"
          value={email}
          onChangeText={setEmail}
          autoCapitalize="none"
          style={styles.input}
        />
        <TextInput
          placeholder="Mot de passe"
          value={password}
          onChangeText={setPassword}
          secureTextEntry
          style={styles.input}
        />

        <TouchableOpacity style={styles.btn} onPress={handleLogin} disabled={loading}>
          {loading ? <ActivityIndicator color="#FFF"/> : <Text style={styles.btnText}>Se connecter</Text>}
        </TouchableOpacity>
      </View>
    </View>
  );
}

const styles = StyleSheet.create({
  container: { flex: 1, justifyContent: 'center', padding: 20, backgroundColor: '#F9FAFB' },
  logoArea: { alignItems: 'center', marginBottom: 40 },
  title: { fontSize: 32, fontWeight: 'bold', color: '#2563EB' },
  subtitle: { fontSize: 16, color: '#6B7280', marginTop: 5 },
  form: { backgroundColor: 'white', padding: 20, borderRadius: 16, shadowOpacity: 0.05, shadowRadius: 10, elevation: 2 },
  input: { backgroundColor: '#F3F4F6', padding: 15, borderRadius: 10, marginBottom: 15, fontSize: 16 },
  btn: { backgroundColor: '#2563EB', padding: 15, borderRadius: 10, alignItems: 'center' },
  btnText: { color: 'white', fontWeight: 'bold', fontSize: 16 }
});
C. Écran Liste des Patients (PatientListScreen.js)
C'est l'écran intermédiaire. Il charge les données via JSON-RPC en filtrant sur [('user_id', '=', currentNurseId)].
JavaScript
// Extrait simplifié
// useEffect charge les patients :
// Odoo Search_read sur 'res.partner'
// Domain: [['user_id', '=', nurseId], ['customer_rank', '>', 0]]

const renderPatient = ({ item }) => (
  <TouchableOpacity
    style={styles.patientCard}
    onPress={() => navigation.navigate('OrderInterface', { patient: item })} // On envoie tout l'objet patient à l'écran suivant
  >
    <Text style={styles.name}>{item.name}</Text>
    <Text style={styles.address}>{item.street}, {item.zip} {item.city}</Text>
    <Text style={styles.info}>Dernière visite : Hier</Text>
  </TouchableOpacity>
);
Mes recommandations stratégiques
- Gestion du "Offline" (Important) : Les infirmières passent souvent dans des zones blanches ou des ascenseurs.
- Conseil : Au moment du login le matin (quand elle a du réseau), l'application doit télécharger la liste des patients et les produits (stockage local via AsyncStorage ou SQLite). Comme ça, elle peut consulter sa liste sans 4G. L'envoi de commande (audio) se mettrait en file d'attente et partirait dès le retour du réseau.
- Filtrage Géographique :
- Si vous utilisez les champs d'adresse, vous pouvez trier la liste des patients par proximité GPS (en utilisant expo-location) par rapport à la position actuelle de l'infirmière. C'est une "killer feature" pour elles.
- Sécurité :
- Ne stockez jamais le mot de passe en clair. Utilisez SecureStore (Expo) pour garder le token de session si vous voulez éviter qu'elle se reconnecte 10 fois par jour.
Variante pour identification via call MCP FIREBASE pour GOOGLE ID
C'est une excellente idée. Utiliser Firebase Authentication (avec Google Sign-In) est bien plus robuste et sécurisé que de gérer des mots de passe Odoo directement dans l'application. Cela simplifie la vie de l'infirmière (un seul clic pour se connecter) et délègue toute la sécurité (MFA, tokens, etc.) à Google.
Voici l'architecture détaillée et le code React Native pour l'écran de connexion via Firebase.
1. Architecture Proposée : Le flux "Oauth 2.0 + Odoo"
L'architecture change légèrement. Nous n'envoyons plus un mot de passe à Odoo. Nous échangeons des tokens.
Le Flux de Données (Data Flow) :
- App Mobile : L'infirmière clique sur "Se connecter avec Google".
- Firebase Auth : Gère l'authentification Google et renvoie un idToken (JWT) sécurisé à l'application mobile.
- App Mobile -> Odoo : L'application envoie ce token (via JSON-RPC) à un endpoint spécifique dans Odoo (que nous devons configurer ou utiliser via un module existant comme auth_oauth).
- Odoo (Backend) :
- Vérifie la validité du token auprès de Google.
- Cherche l'utilisateur Odoo associé à cet email (ursula.nurse@soins.com).
- Ouvre une session Odoo et renvoie le session_id à l'application.
- App Mobile : Stocke le session_id et accède aux données (Tournée, Produits).
2. Configuration Technique
Pré-requis :
- Firebase Console : Créer un projet, activer "Google Sign-In", et récupérer le fichier google-services.json (Android) et GoogleService-Info.plist (iOS).
- Odoo : Installer le module natif "OAuth2 Authentication". Dans Paramètres > Utilisateurs > OAuth Providers, configurer Google avec le "Client ID" fourni par Firebase.
Dépendances React Native :
Bash
npx expo install expo-auth-session expo-crypto @react-native-firebase/app @react-native-firebase/auth
# Pour Expo Go (développement facile), on utilise souvent expo-auth-session/providers/google
3. Code de l'Écran de Connexion (LoginScreen.js)
Voici l'écran refait. Il est propre, professionnel, et intègre le bouton Google.
JavaScript
import React, { useEffect, useState } from 'react';
import {
  StyleSheet,
  View,
  Text,
  TouchableOpacity,
  Image,
  ActivityIndicator,
  Alert
} from 'react-native';
import { StatusBar } from 'expo-status-bar';
import * as Google from 'expo-auth-session/providers/google';
import * as WebBrowser from 'expo-web-browser';
import { ShieldCheck, HeartPulse } from 'lucide-react-native';

// Important pour que le popup Auth fonctionne correctement
WebBrowser.maybeCompleteAuthSession();

export default function LoginScreen({ navigation }) {
  const [loading, setLoading] = useState(false);

  // --- CONFIGURATION GOOGLE AUTH ---
  // Remplacez par vos Client IDs (depuis la console Google Cloud / Firebase)
  const [request, response, promptAsync] = Google.useAuthRequest({
    iosClientId: 'VOTRE_IOS_CLIENT_ID.apps.googleusercontent.com',
    androidClientId: 'VOTRE_ANDROID_CLIENT_ID.apps.googleusercontent.com',
    webClientId: 'VOTRE_WEB_CLIENT_ID.apps.googleusercontent.com',
  });

  useEffect(() => {
    if (response?.type === 'success') {
      const { authentication } = response;
      // On a le token Google ! Maintenant on le valide avec Odoo
      handleOdooLogin(authentication.accessToken, authentication.idToken);
    }
  }, [response]);

  // --- LOGIQUE D'ÉCHANGE AVEC ODOO ---
  const handleOdooLogin = async (accessToken, idToken) => {
    setLoading(true);
    try {
      // 1. Appel à votre endpoint Odoo custom ou natif OAuth
      // Note : Ceci est un exemple conceptuel d'appel RPC
      const odooResponse = await fetch('https://votre-odoo.com/auth_oauth/signin', {
        method: 'POST',
        headers: { 'Content-Type': 'application/json' },
        body: JSON.stringify({
          params: {
            access_token: accessToken,
            token_type: 'Bearer',
            provider: 'google' // ID du provider dans Odoo
          }
        })
      });

      const result = await odooResponse.json();

      if (result.result && result.result.session_id) {
        // SUCCÈS : On récupère l'info de l'infirmière
        const nurseData = {
          uid: result.result.uid,
          name: result.result.name, // ex: "Infirmière Sophie"
          sessionId: result.result.session_id
        };

        // On navigue vers la tournée
        navigation.replace('DashboardTournee', { nurse: nurseData });
      } else {
        throw new Error("Compte Odoo non trouvé pour cet email Google.");
      }

    } catch (error) {
      console.error(error);
      Alert.alert("Erreur de connexion", "Impossible de vous authentifier auprès d'Odoo. Vérifiez que votre email Google est bien renseigné dans votre fiche utilisateur Odoo.");
    } finally {
      setLoading(false);
    }
  };

  return (
    <View style={styles.container}>
      <StatusBar style="dark" />

      {/* Partie Haute : Branding */}
      <View style={styles.header}>
        <View style={styles.logoCircle}>
          <HeartPulse size={40} color="#EF4444" />
        </View>
        <Text style={styles.appName}>SoinsConnect</Text>
        <Text style={styles.tagline}>L'assistant mobile des infirmières</Text>
      </View>

      {/* Partie Basse : Actions */}
      <View style={styles.footer}>
        <View style={styles.securityBadge}>
          <ShieldCheck size={16} color="#059669" />
          <Text style={styles.securityText}>Connexion Sécurisée HDS</Text>
        </View>

        <Text style={styles.welcomeText}>Identifiez-vous pour accéder à votre tournée</Text>

        <TouchableOpacity
          style={[styles.googleBtn, loading && styles.disabledBtn]}
          onPress={() => promptAsync()}
          disabled={!request || loading}
        >
          {loading ? (
            <ActivityIndicator color="#FFF" />
          ) : (
            <>
              {/* Logo Google SVG simulé ou image */}
              <Image
                source={{ uri: 'https://upload.wikimedia.org/wikipedia/commons/thumb/c/c1/Google_%22G%22_logo.svg/1200px-Google_%22G%22_logo.svg.png' }}
                style={styles.googleIcon}
              />
              <Text style={styles.googleBtnText}>Continuer avec Google</Text>
            </>
          )}
        </TouchableOpacity>

        <Text style={styles.helpText}>
          En cas de problème d'accès, contactez le service informatique.
        </Text>
      </View>
    </View>
  );
}

const styles = StyleSheet.create({
  container: {
    flex: 1,
    backgroundColor: '#FEF2F2', // Un fond très léger rouge/santé
  },
  header: {
    flex: 1.5,
    justifyContent: 'center',
    alignItems: 'center',
  },
  logoCircle: {
    width: 80,
    height: 80,
    backgroundColor: 'white',
    borderRadius: 40,
    justifyContent: 'center',
    alignItems: 'center',
    shadowColor: "#EF4444",
    shadowOffset: { width: 0, height: 10 },
    shadowOpacity: 0.2,
    shadowRadius: 20,
    elevation: 10,
    marginBottom: 20
  },
  appName: {
    fontSize: 32,
    fontWeight: '900',
    color: '#1F2937',
    letterSpacing: -0.5
  },
  tagline: {
    fontSize: 16,
    color: '#6B7280',
    marginTop: 8
  },
  footer: {
    flex: 1,
    backgroundColor: 'white',
    borderTopLeftRadius: 30,
    borderTopRightRadius: 30,
    padding: 30,
    alignItems: 'center',
    shadowColor: "#000",
    shadowOffset: { width: 0, height: -5 },
    shadowOpacity: 0.05,
    shadowRadius: 20,
    elevation: 10,
  },
  securityBadge: {
    flexDirection: 'row',
    alignItems: 'center',
    backgroundColor: '#D1FAE5',
    paddingHorizontal: 12,
    paddingVertical: 6,
    borderRadius: 20,
    marginBottom: 20
  },
  securityText: {
    color: '#059669',
    fontWeight: '600',
    fontSize: 12,
    marginLeft: 6
  },
  welcomeText: {
    fontSize: 18,
    fontWeight: '600',
    color: '#374151',
    textAlign: 'center',
    marginBottom: 30
  },
  googleBtn: {
    flexDirection: 'row',
    alignItems: 'center',
    backgroundColor: '#1F2937', // Noir Google / Apple style
    width: '100%',
    paddingVertical: 16,
    borderRadius: 16,
    justifyContent: 'center',
    shadowColor: "#000",
    shadowOffset: { width: 0, height: 4 },
    shadowOpacity: 0.2,
    shadowRadius: 5,
    elevation: 5,
  },
  disabledBtn: {
    opacity: 0.7
  },
  googleIcon: {
    width: 24,
    height: 24,
    marginRight: 12,
    backgroundColor: 'white',
    borderRadius: 12
  },
  googleBtnText: {
    color: 'white',
    fontSize: 16,
    fontWeight: 'bold'
  },
  helpText: {
    marginTop: 24,
    color: '#9CA3AF',
    fontSize: 12,
    textAlign: 'center',
    paddingHorizontal: 20
  }
});
Points de vigilance sur l'intégration Odoo / Firebase
C'est le point critique : Firebase sait que c'est "Ursula", mais Odoo doit le savoir aussi.
- Mapping des Emails : Il faut impérativement que l'email utilisé pour le compte Google (ex: ursula@soins.fr) soit exactement le même que celui renseigné dans le champ "Login" ou "Adresse Email" de l'utilisateur dans Odoo.
- Module Auth OAuth : Dans Odoo, le module natif auth_oauth gère très bien cela. Quand l'app envoie le token, Odoo vérifie l'email contenu dans le token. S'il trouve un utilisateur avec cet email, il le logue. Sinon, il rejette la connexion.
- Service Account : Pas besoin ici. L'authentification se fait côté client (App Mobile) et validation côté serveur (Odoo). Vous n'avez pas besoin de monter un serveur intermédiaire Node.js/Python, Odoo peut valider le token Google directement.
le dashboard "Ma Tournée"
C'est la pièce maîtresse de l'application. Ce dashboard doit être instantanément compréhensible : "Où vais-je maintenant ?" et "Qui ai-je déjà vu ?
Voici le code React Native complet pour l'écran "Ma Tournée".
Fonctionnalités Clés intégrées :
- Timeline Visuelle : Une ligne de temps verticale relie les patients pour visualiser le trajet.
- Statuts Clairs : "À venir" (Bleu/Gras), "Terminé" (Grisé/Check), "En cours" (Pulsation).
- Actions Rapides : Boutons pour appeler le patient ou lancer le GPS (Waze/Maps) sans entrer dans la fiche.
- Mode "Urgence" : Un indicateur visuel si un soin spécifique est critique (ex: Insuline).
Le Code (DashboardTournee.js)
JavaScript
import React, { useState, useEffect } from 'react';
import {
  StyleSheet,
  View,
  Text,
  FlatList,
  TouchableOpacity,
  Image,
  Linking,
  Platform
} from 'react-native';
import { StatusBar } from 'expo-status-bar';
import {
  Phone,
  MapPin,
  ChevronRight,
  CheckCircle2,
  Clock,
  Navigation,
  LogOut
} from 'lucide-react-native';

// --- DONNÉES SIMULÉES (Venant d'Odoo en production) ---
const TOURNEE_DATA = [
  {
    id: '1',
    time: '08:00',
    name: 'M. Jean DUPONT',
    address: '12 Av. des Gobelins',
    status: 'done', // done, current, todo
    careType: 'Toilette complète',
    avatar: 'https://i.pravatar.cc/150?u=1',
    phone: '0601020304'
  },
  {
    id: '2',
    time: '08:45',
    name: 'Mme. Ursula LAURET',
    address: '137 rue d\'Alésia',
    status: 'current',
    careType: 'Pansement + Commande',
    isCritical: true, // Soin important
    avatar: 'https://i.pravatar.cc/150?u=5',
    phone: '0605050505'
  },
  {
    id: '3',
    time: '09:30',
    name: 'M. Pierre MARTIN',
    address: '45 Rue des Plantes',
    status: 'todo',
    careType: 'Injection Insuline',
    avatar: 'https://i.pravatar.cc/150?u=3',
    phone: '0606060606'
  },
  {
    id: '4',
    time: '10:15',
    name: 'Mme. Sophie DURAND',
    address: '8 Impasse du Moulin',
    status: 'todo',
    careType: 'Distribution médicaments',
    avatar: 'https://i.pravatar.cc/150?u=4',
    phone: '0707070707'
  },
];

export default function DashboardTournee({ navigation, route }) {
  // Récupération des infos infirmière passées par l'écran Login
  const nurseName = route.params?.nurse?.name || "Infirmière";

  // Calcul de progression
  const progress = 25; // % fictif pour la barre de progression

  // Actions utilitaires
  const openGPS = (address) => {
    const url = Platform.select({
      ios: `maps:0,0?q=${address}`,
      android: `geo:0,0?q=${address}`,
    });
    Linking.openURL(url);
  };

  const callPatient = (phone) => {
    Linking.openURL(`tel:${phone}`);
  };

  const goToOrder = (patient) => {
    // Navigation vers l'écran de commande que nous avons fait avant
    navigation.navigate('OrderInterface', { patient });
  };

  // Rendu d'une carte patient
  const renderPatientCard = ({ item, index }) => {
    const isLast = index === TOURNEE_DATA.length - 1;
    const isDone = item.status === 'done';
    const isCurrent = item.status === 'current';

    return (
      <View style={styles.timelineRow}>
        {/* Colonne de Gauche (Heure + Ligne) */}
        <View style={styles.timelineLeft}>
          <Text style={[styles.timeText, isCurrent && styles.timeTextCurrent]}>{item.time}</Text>
          <View style={styles.timelineLineContainer}>
            <View style={[
              styles.timelineDot,
              isDone && styles.dotDone,
              isCurrent && styles.dotCurrent
            ]}>
              {isDone && <CheckCircle2 size={14} color="white" />}
              {isCurrent && <View style={styles.pulsingDot} />}
            </View>
            {!isLast && <View style={[styles.verticalLine, isDone && styles.lineDone]} />}
          </View>
        </View>

        {/* Carte Principale */}
        <TouchableOpacity
          style={[
            styles.card,
            isDone && styles.cardDone,
            isCurrent && styles.cardCurrent
          ]}
          onPress={() => goToOrder(item)}
          activeOpacity={0.9}
        >
          <View style={styles.cardHeader}>
            <Image source={{ uri: item.avatar }} style={[styles.avatar, isDone && styles.avatarDone]} />
            <View style={styles.cardInfo}>
              <Text style={[styles.patientName, isDone && styles.textDone]}>{item.name}</Text>
              <Text style={styles.careType}>
                {item.isCritical && <Text style={{color: '#EF4444', fontWeight: 'bold'}}>⚠️ </Text>}
                {item.careType}
              </Text>
            </View>
            <ChevronRight color="#9CA3AF" size={20} />
          </View>

          {/* Actions Rapides (Uniquement si pas terminé) */}
          {!isDone && (
            <View style={styles.cardActions}>
              <TouchableOpacity style={styles.actionBtn} onPress={() => openGPS(item.address)}>
                <Navigation size={16} color="#2563EB" />
                <Text style={styles.actionText}>Y aller</Text>
              </TouchableOpacity>

              <View style={styles.divider} />

              <TouchableOpacity style={styles.actionBtn} onPress={() => callPatient(item.phone)}>
                <Phone size={16} color="#059669" />
                <Text style={[styles.actionText, { color: '#059669' }]}>Appeler</Text>
              </TouchableOpacity>
            </View>
          )}
        </TouchableOpacity>
      </View>
    );
  };

  return (
    <View style={styles.container}>
      <StatusBar style="light" />

      {/* En-tête Bleu (Résumé Tournée) */}
      <View style={styles.header}>
        <View style={styles.headerTop}>
          <View>
            <Text style={styles.greeting}>Bonjour,</Text>
            <Text style={styles.nurseName}>{nurseName}</Text>
          </View>
          <TouchableOpacity style={styles.logoutBtn} onPress={() => navigation.replace('Login')}>
            <LogOut color="white" size={20} />
          </TouchableOpacity>
        </View>

        <View style={styles.progressContainer}>
          <View style={styles.progressTextRow}>
            <Text style={styles.progressLabel}>Progression tournée</Text>
            <Text style={styles.progressValue}>1 / 4</Text>
          </View>
          <View style={styles.progressBarBg}>
            <View style={[styles.progressBarFill, { width: `${progress}%` }]} />
          </View>
        </View>
      </View>

      {/* Liste des visites */}
      <View style={styles.content}>
        <Text style={styles.sectionTitle}>Aujourd'hui, 24 Nov.</Text>

        <FlatList
          data={TOURNEE_DATA}
          renderItem={renderPatientCard}
          keyExtractor={item => item.id}
          contentContainerStyle={styles.listContent}
          showsVerticalScrollIndicator={false}
        />
      </View>

      {/* FAB (Floating Action Button) pour Urgence ou Ajout */}
      <TouchableOpacity style={styles.fab}>
        <MapPin color="white" size={24} />
        <Text style={styles.fabText}>Carte</Text>
      </TouchableOpacity>
    </View>
  );
}

const styles = StyleSheet.create({
  container: { flex: 1, backgroundColor: '#F3F4F6' },

  // HEADER
  header: { backgroundColor: '#2563EB', padding: 24, paddingTop: 60, borderBottomLeftRadius: 30, borderBottomRightRadius: 30 },
  headerTop: { flexDirection: 'row', justifyContent: 'space-between', alignItems: 'center', marginBottom: 20 },
  greeting: { color: '#BFDBFE', fontSize: 16, fontWeight: '500' },
  nurseName: { color: 'white', fontSize: 24, fontWeight: 'bold' },
  logoutBtn: { backgroundColor: 'rgba(255,255,255,0.2)', padding: 10, borderRadius: 12 },

  progressContainer: { marginTop: 5 },
  progressTextRow: { flexDirection: 'row', justifyContent: 'space-between', marginBottom: 8 },
  progressLabel: { color: '#DBEAFE', fontSize: 12, fontWeight: '600' },
  progressValue: { color: 'white', fontSize: 12, fontWeight: 'bold' },
  progressBarBg: { height: 6, backgroundColor: 'rgba(0,0,0,0.2)', borderRadius: 3 },
  progressBarFill: { height: 6, backgroundColor: '#4ADE80', borderRadius: 3 },

  // CONTENU
  content: { flex: 1, paddingHorizontal: 20, marginTop: 20 },
  sectionTitle: { fontSize: 18, fontWeight: 'bold', color: '#374151', marginBottom: 15 },
  listContent: { paddingBottom: 100 },

  // TIMELINE & CARTE
  timelineRow: { flexDirection: 'row', marginBottom: 0 },
  timelineLeft: { width: 50, alignItems: 'center', paddingTop: 2 },
  timeText: { fontSize: 12, fontWeight: '600', color: '#6B7280', marginBottom: 8 },
  timeTextCurrent: { color: '#2563EB', fontWeight: 'bold' },

  timelineLineContainer: { alignItems: 'center', flex: 1 },
  timelineDot: { width: 14, height: 14, borderRadius: 7, backgroundColor: '#D1D5DB', alignItems: 'center', justifyContent: 'center', zIndex: 1 },
  dotDone: { backgroundColor: '#059669', width: 20, height: 20, borderRadius: 10 },
  dotCurrent: { backgroundColor: '#2563EB', width: 18, height: 18, borderRadius: 9, borderWidth: 3, borderColor: '#BFDBFE' },
  verticalLine: { width: 2, backgroundColor: '#E5E7EB', flex: 1, marginVertical: 4 },
  lineDone: { backgroundColor: '#059669' },

  // CARTE PATIENT
  card: { flex: 1, backgroundColor: 'white', borderRadius: 16, padding: 16, marginLeft: 10, marginBottom: 20, shadowColor: '#000', shadowOffset: { width: 0, height: 2 }, shadowOpacity: 0.05, shadowRadius: 4, elevation: 2 },
  cardCurrent: { borderColor: '#2563EB', borderWidth: 1, shadowColor: '#2563EB', shadowOpacity: 0.1 },
  cardDone: { backgroundColor: '#F9FAFB', opacity: 0.8 },

  cardHeader: { flexDirection: 'row', alignItems: 'center' },
  avatar: { width: 48, height: 48, borderRadius: 24, marginRight: 12 },
  avatarDone: { opacity: 0.5 },
  cardInfo: { flex: 1 },
  patientName: { fontSize: 16, fontWeight: 'bold', color: '#1F2937' },
  textDone: { textDecorationLine: 'line-through', color: '#9CA3AF' },
  careType: { fontSize: 13, color: '#6B7280', marginTop: 2 },

  // ACTIONS CARTE
  cardActions: { flexDirection: 'row', marginTop: 16, borderTopWidth: 1, borderTopColor: '#F3F4F6', paddingTop: 12 },
  actionBtn: { flex: 1, flexDirection: 'row', alignItems: 'center', justifyContent: 'center', gap: 6 },
  actionText: { fontSize: 14, fontWeight: '600', color: '#2563EB' },
  divider: { width: 1, backgroundColor: '#E5E7EB', marginHorizontal: 10 },

  // FAB
  fab: { position: 'absolute', bottom: 30, alignSelf: 'center', backgroundColor: '#1F2937', paddingVertical: 12, paddingHorizontal: 24, borderRadius: 30, flexDirection: 'row', alignItems: 'center', gap: 8, shadowColor: '#000', shadowOffset: { width: 0, height: 4 }, shadowOpacity: 0.3, shadowRadius: 8, elevation: 6 },
  fabText: { color: 'white', fontWeight: 'bold', fontSize: 16 }
});
Ce qui rend cet écran efficace :
- Hiérarchie visuelle :
- L'infirmière voit immédiatement la carte "En cours" (Ursula Lauret) car elle est entourée d'un bleu subtil et le point temporel est actif.
- Les patients passés sont grisés pour réduire la charge mentale.
- Connectivité Odoo :
- L'array TOURNEE_DATA est structuré exactement comme ce que renverrait un contrôleur Odoo optimisé (un simple JSON).
- Le statut (status) peut être piloté par l'état de la commande ou de la visite dans Odoo.
- Ergonomie "Pouce" :
- Les boutons "Y aller" (GPS) et "Appeler" sont larges et faciles à atteindre. Plus besoin de copier-coller l'adresse dans Waze.
Avec cet écran + le login Firebase + l'écran de commande vocale, vous avez désormais le flux complet (End-to-End) de l'application MVP.
